
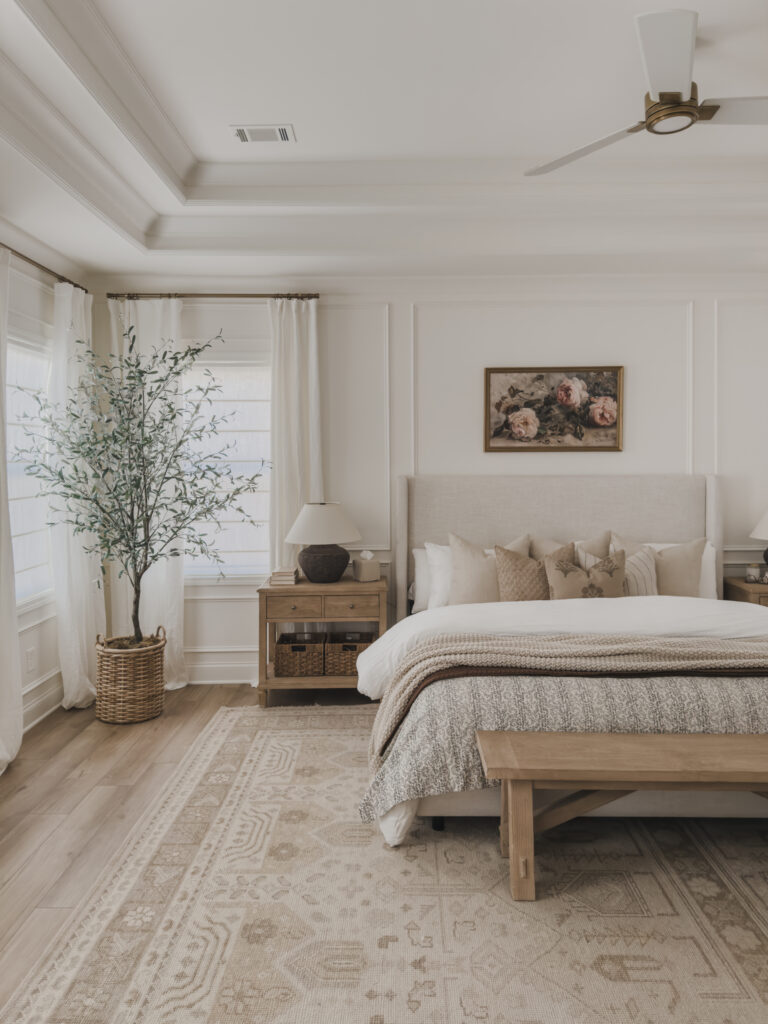
If you’ve ever stared at a blank wall and thought, this room needs something, you’re not alone. That’s exactly how I felt when I decided to add picture box wainscoting to our media room—and now I’ve done it in about half the house. I had zero experience when I started, but this project turned out to be way more beginner-friendly than I expected, especially once I figured out a system that worked for me.
Here’s exactly how I did it, what tools I used, and a few tips that helped me keep my sanity during the process.
Why I Chose PVC Moulding
I used this 6606 base cap moulding from Home Depot. It’s a finished PVC material that’s lightweight, easy to cut, and super forgiving if you’re still learning. If you’re more comfortable with wood, you could definitely use a wood base cap instead—it’s a little cheaper—but I loved how simple this was to work with.
Tools + Materials I Used
Below are all my tested and most loved faves for this project:
- PVC or wood base cap moulding
- Tape measure
- Level
- Painter’s tape
- Pencil
- Miter saw
- Brad nailer (I use this DeWalt electric one) + brads
- Spackle (for nail holes and corners)
- Caulk (for sealing the edges) + caulk gun
- Paint + brush or roller
- Wood spacers (I made 3″ and 6″ spacers to keep things consistent)
Step-by-Step: How I Installed Picture Frame Wainscoting
1. Plan Your Layout
Start by measuring your wall and sketching it out—either on paper or your computer. I plan how many boxes I want from left to right and divide the wall accordingly. I’ve made a few “rules” for myself to keep things consistent:
- Vertical spacing (between boxes and trim): always 3″
- Horizontal spacing (between boxes or windows/doors): always 6″
- Corner rule: each side gets 3″, so the corner “split” is 6″ total
- Bottom box height: always 2 feet tall
- Top box height: whatever’s left after subtracting vertical spacing and the 2’ base box
These rules help everything feel intentional—even if walls or windows don’t line up perfectly.
2. Draw It Out
Using a pencil, level, and tape measure, I mark out each box directly on the wall. This step takes a little time, but it makes the install go way smoother. I double-check my measurements against my sketch, adjust as needed, and then label each side with the exact trim length I’ll need to cut.

Pro tip: When I’m planning the layout, I treat windows and doors just like I would any other box—they get the same spacing rules on either side. Then, I fill in the space above or below with a box that matches the width of the window or door. It helps everything feel balanced and intentional, and it keeps the pattern flowing without any weird gaps or awkward blank spots. This approach also makes it way easier to plan things out when you’re working around architectural elements.
3. Cut and Dry Fit
Once I’ve got all my measurements, I cut the trim for each side using my miter saw. Before I nail anything, I dry fit everything using painter’s tape to hold the pieces on the wall. This is a great chance to see the full picture and make sure all your math checks out.
4. Install the Trim
Starting on one side of the room and from the bottom up, I nail each piece into place using the guides I drew. My game-changing cheat? I made two wood spacer blocks—one 3″ and one 6″—so I can quickly check gaps and line things up without pulling out the tape measure a thousand times.
5. Watch for Sloped Ceilings or Baseboards
Pro tip: not all ceilings and baseboards are level. If it’s way off, you might need to follow the line of the trim instead of your level lines—otherwise the wainscoting will just emphasize the slant. But if it’s just a small difference, I usually stick to my level lines and it’s totally fine.
6. Spackle + Caulk
After everything’s nailed in, I fill the nail holes and corners with spackle. (You can use caulk for the corners too, but I prefer spackle because it doesn’t shrink.) Then I run caulk along both sides of the trim to give it that clean, built-in look.
7. Paint and Admire
Once the caulk is dry, all that’s left is painting! I usually do the trim and wall the same color for a seamless, high-end look—but you can totally get creative with contrast colors or wallpaper inside the boxes.
Final Thoughts
Wainscoting adds instant character to a space, and once you get into the rhythm of it, it’s really satisfying and goes up pretty quick. I find the caulking and spackling followed by painting to be the bulk of the time spent. And you don’t need a fancy workshop or years of experience—just a plan, a few tools, and a little patience.
And trust me, once you do one room, you’ll want to keep going. Ask me how I know 😉
Want to see behind-the-scenes photos or videos of the install? I’ve got a full highlight on my Instagram and I’ll be sharing more as I keep adding it to the rest of the house!

Comments Off on How I Installed Picture Box Wainscoting – Step-by-step DIY